The Correct Row is for editing text. It allows users to quickly and easily put the correct words in the correct places.
The Correct Row provides the first level of word processing, the only level that users will need to write e-mails, notes, and simple documents. The Style Row (described in the next section) provides the second level, allowing users to change the appearance of type to create formal letters, resumes, and other documents.
All the most basic editing operations can be performed using just the Thumb Keys, and that is how beginners will edit. Though most conventional spelling errors are eliminated in the Express Keys system, there will always be typos. Users of Express Keys can undo most of their mistakes by simply making a single quick movement of their left thumb.
The Correct Row makes the Finger Keys into sophisticated extensions of the basic editing functions of the Thumb Keys. Users will appreciate how the Correct Row allows all sorts of time-saving refinements of the basic editing operations, and provide a number of editing functions never available to writers before.
In the future, when most text will likely be entered with the voice rather than with fingers, people will still prefer to edit text with their fingers because text manipulations can be performed so efficiently that way, especially with this system. The Correct Row is designed to make editing text as easy as it can be, for as long as people write.
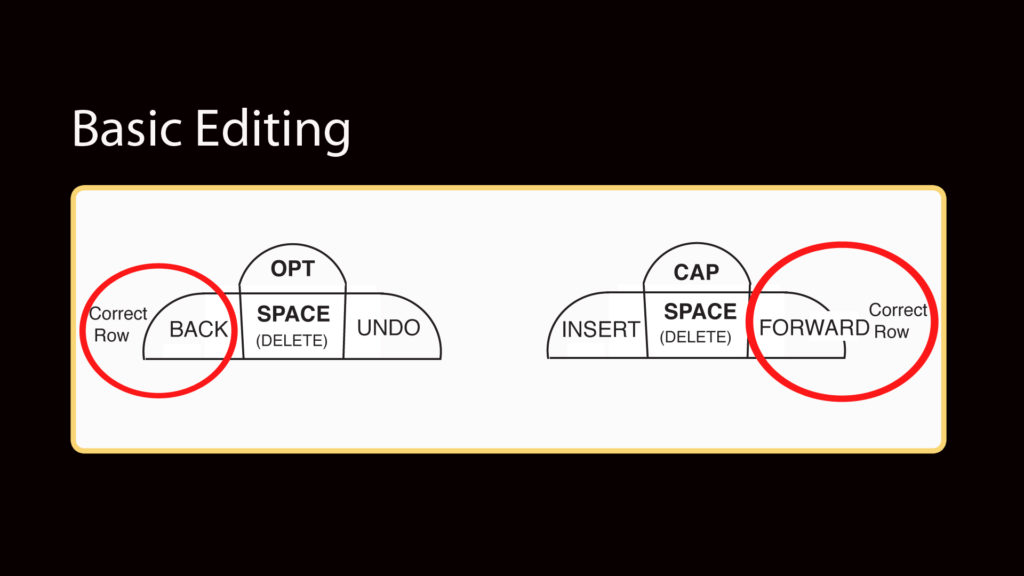
Thumb Keys
With the exception of the Row Keys on the bottom row, all the subkeys on both Thumb Keys (written in bold below) function as part of the Correct Row. These Thumb Keys can accomplish all the primary editing functions, as explained below. Beginners will be able to move through text and edit using just these keys. They are identical to the Thumb Keys in the Word Row except that the Cap key has become a second Option key.
Quick Fix: Editing Functions of Thumb Keys
When a QWERTY keyboard user types an unintended letter or word, he must move his hands away from the home row in order to press the delete key in the upper right corner of the keyboard. Then, he either highlights the word using a mouse or by pressing the command and shift keys in the lower left corner of the keyboard along with arrow keys in the bottom right corner. Finally, after selecting and deleting the unit of text to be corrected, the user must find his way back to the home row before he can resume typing. In short, the process of correction involves a lot of movements, and these are both time consuming and likely to produce further errors.
In Express Keys Speed Typing, most errors are eliminated, particularly the incorrect sequencing of letters and/or spaces. In addition, because the user’s fingers do not have to travel between keys, there are fewer accidents. Best of all, when a user types an unintended letter or word, he can press a single Thumb Key (either Forward or Back) and instantly be in a position to type over his mistake, without having to move his fingers out of typing position. “Quick fixes” are an integral part of the Express Keys design.
Thumb Keys: More Details
Here is a more detailed description of the functions of each of the Thumb Keys. Taken together, the Thumb Keys cover all basic editing functions.
UNDO Key
When the user wants to “untype” the last letter (or letters) he has just typed, he simply presses the Undo key with his left thumb, and resumes typing. Undo performs the function that “Command plus Z” does in conventional typing: it undoes the previous action(s). The user presses Undo to remove a highlight just made or an action just performed.
BACK Key
When the user wants to delete the previous word or write over it, he presses and releases the Back key. By doing this single action, the user accomplishes three things simultaneously: One, he moves to the previous word. Two, he highlights that word. And three, he instantly puts himself in a position to either delete that word or write over it—all this without having to move his fingers out of typing position. The user can instantly be in position to type over a word by pressing the Back key with his left thumb.
FORWARD Key
The Forward key performs the same function as the Back key, but highlights the word to the right of the cursor, and prepares that word to be either deleted or written over. This key is particularly useful during the rewriting stage, when the user is moving forward through the document from the beginning to the end.
If a word is highlighted and the user presses either the Back or Forward key again, the next word is highlighted and the previous word is unhighlighted. In this way, the beginning user can move through the document word by word to fix mistakes, at least until he learns the more powerful navigational methods and commands of the Finger Keys. If the user prefers to move through the text one letter at a time rather than one word at a time, he can press the OPT key when he presses the Forward key or the Back key. In that case, one letter at a time will be highlighted rather than one word.
DELETE Key
When a word or text block is highlighted, the user can delete it by pressing the Delete key. Just as in conventional typing, the Space key becomes a Delete key when a word is a highlighted. The user can also press Delete and Back at the same time to delete the word to the left, or press Delete and Forward to delete the word to the right. In addition, the user can press Undo and Space at the same time to remove any spaces in highlighted text, such as removing the space between home and work to create the word homework.
INSERT Key
If a user wants to insert text in front of a highlighted word rather than write over it or delete it, he presses the Insert key. The highlight is removed and the cursor is placed in front of the word. Text can then be inserted at that point. If the user wishes to insert text or punctuation at the back end of a word, he double clicks the Insert key and the cursor is moved to the end of the word.
Users can press Insert and Space together to automatically insert a space between two words, such as when adding a space to “Jackwent” to create “Jack went.” The Insert key also functions as a Select key when a list of options (such as synonyms) is given the user.
OPT KEY
When pressed with Forward or Back, the Opt keys allow users to highlight one letter at a time rather than one word.
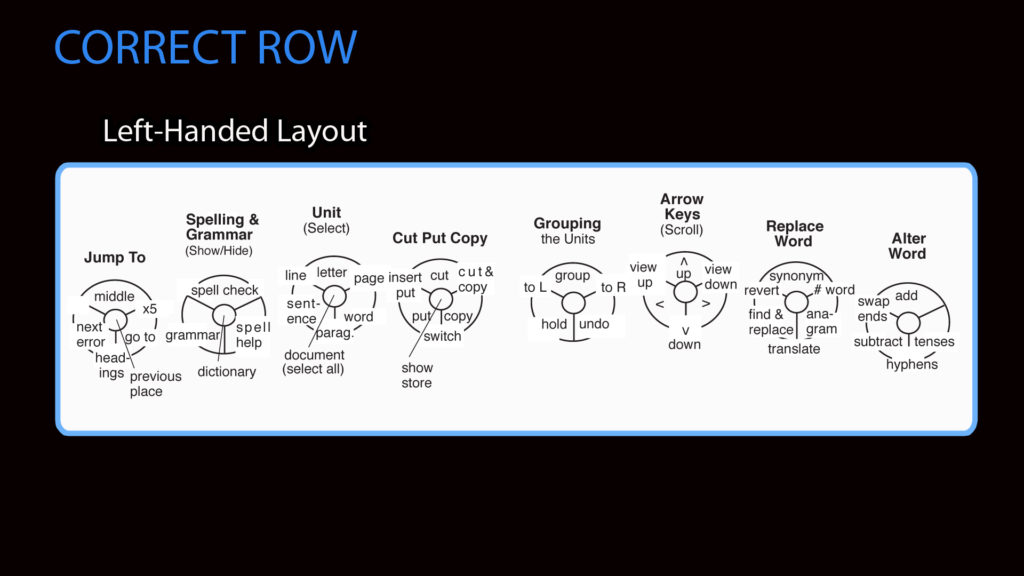
Finger Keys—The Correct Row
The Finger Keys extend and refine the primary editing functions performed by the Thumb Keys. They make what is called the Correct Row. This Row give users the ability to locate and select any block of text quickly (without the use of a mouse) and also to perform a wide variety of editing operations on a selected unit of text. The Correct Row features many new editing capabilities, and is designed to be the means by which text is edited long after most text is “typed in” with the human voice.
Overview of the Correct Row
When the Back key is pressed, the word to the left of the cursor is highlighted. When the Forward key is pressed, the word to the right is highlighted. In both cases, the Finger Keys are transformed into the Correct Row for as long as the Forward or Back key is held down by a thumb. Then the Finger Keys become able to perform all sorts of editing operations on the highlighted text. When the user releases the Back or Forward key, the highlight on the selected text remains in place, and the Finger Keys automatically return to the Word Row. This means that the user can then type over the highlighted word (the mistake), or delete the word by pressing Delete, or press Insert to insert text in front of the highlighted word.
Here are brief descriptions of some of the Keys in the Correct Row:
UNIT Key

Since we think in words, the Express Keys are designed to write words rather than letters. Therefore, the Back and Forward keys move through text and highlight text one word at a time—unless told otherwise. The Unit key allows users to move through and highlight any unit of text—letter, word, sentence, line, paragraph, page, or document. It allows users to find and select text anywhere in the document much more efficiently than a mouse does, making the Correct Row ideal for use on portable devices.
To give an example of how the Unit key works: Suppose the user wants to correct an error in the second-to-last sentence in the previous paragraph. He presses Back with his thumb and presses “paragraph” on the Unit key to highlight the present paragraph. He presses “paragraph” again to select (highlight) the paragraph before that. He then presses “sentence” which selects the last sentence in that paragraph, and then presses that key again to select the sentence before that. If he had wanted to fix the first sentence in that highlighted paragraph, he would have pressed the Forward key and then “sentence.” When the Forward key is held down, the user moves left to right through the document, and when Back is held down, from right to left.
To clarify one thing about the use of the Unit key: The cursor is placed at the beginning of the word about to be typed, so pressing Back will highlight the previous word, and pressing Forward will highlight the following word. But what if someone is in the middle of a unit of text rather than at the beginning or end, as in the example above when the user was in the middle of a paragraph? In this case, pressing Back and “paragraph” would first highlight the current paragraph, and so would pressing Forward and “paragraph.” When the cursor is within a selected unit rather than at the beginning or end of it, pressing Back or Forward selects that unit.
When any of the subkeys on the Unit key are held down for more than a moment, the cursor is automatically advanced through the desiredunit one at a time, in the same way a user holding down x in conventional typing will get a repeated action: xxxxxx.
Using the Unit key, the user is able to select anything in the document with a few quick finger motions (much like typing a word), usually in less time than it takes to wrap one’s hand around a mouse.
GROUPING Key

The user will often want to highlight a group of Words at once, or a number of different text units at once, and sometimes these text units are spread throughout the document. For such situations, there is the Grouping key.
Grouping and Undo
When the Back key is pressed and released, the Word to the left of the cursor is highlighted. When Back is pressed and released again, the next Word is highlighted while the previous word is unhighlighted. But when the user wishes to select (highlight) one unit of text without losing the highlight on the previous selection, he presses and holds the Group key.
As an example: To select this sentence and the previous two sentences, the user would hold down the Back key to enter the Correct Row, and then hold down the Group key while pressing “sentence” on the Unit key three times. All three sentences are selected. If the user accidentally hits “sentence” four times, he simply presses “undo” on the Group key to undo the last grouping. (The thumb’s Undo key is inaccessible during this operation because the thumb must hold down the Back or Forward key to remain in the Correct Row.)
Hold
When the user wishes to highlight a number of text units that are not neighbors to one another, he uses the hold subkey. As an example, if he wants to highlight this paragraph and the paragraph above the previous paragraph, he would press Back to enter the Correct Row and then “paragraph” to highlight this paragraph. Then he would press and release “hold” to hold the highlight on this paragraph. Then he would press “paragraph” twice to pass over the paragraph above and select the one above that. In this way, the user can “hold” as many different highlights as he wants. If he wants to undo a Hold, he can press the Undo key to undo the hold on the current selection without losing hold of the other selection(s).
To L and To R
These subkeys are used to make certain text-selecting operations more efficient. If the user highlights a word, he can press “sentence” and “to L,” and then all the words in that sentence to the left of that word will be selected. If he presses “to R” and the “paragraph” key, all the words in the paragraph to the right of that word will be selected.
CUT PUT COPY Key
This key is used to move blocks of text from one location to another.
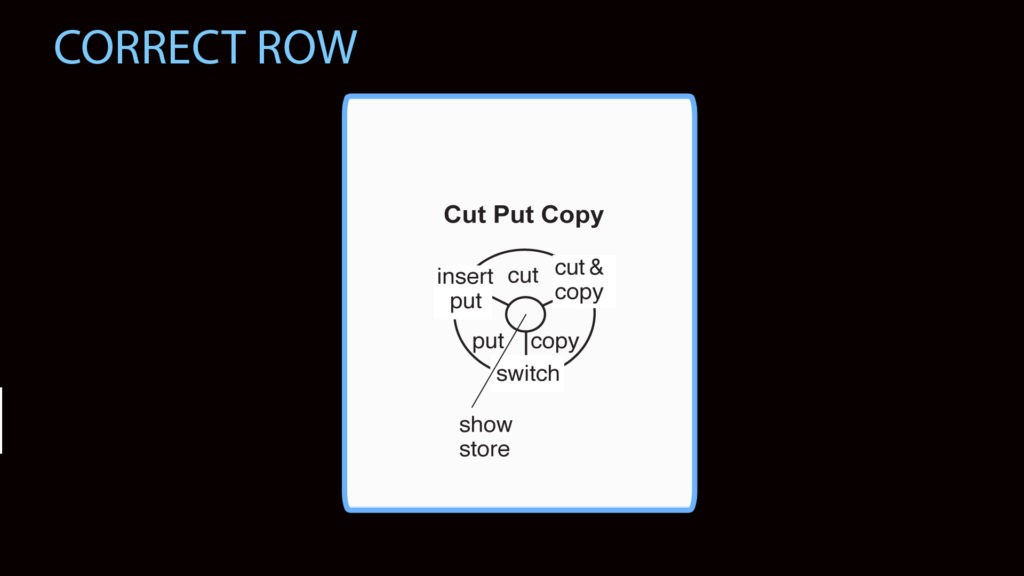
Switch*
The Switch key could be considered a “leap frog key.” When a unit of text is highlighted, pressing the Switch key will move the selected unit of text ahead of the unit before it. In this way, two letters in a word can be switched quickly, or two words in a sentence, or two paragraphs on a page. Pressing switch again will move the same unit again—in effect, advancing the unit through the text. In many cases, this operation will perform the conventional operation of copying and pasting much more efficiently.
*Asterisks on this page indicate that the editing function is new.
Copy
Press this subkey to copy the selected (highlighted) text and place it in “the store.” The store is equivalent to the Pasteboard or Clipboard in conventional word processing programs—it stores any number of copied pieces of text for further use.
Cut
This performs the same function as the Delete Key. The redundancy is because it is often easier to delete highlighted text with fingers rather than thumbs. When text is Cut, it is not put in “the store,” though, if its erasure is accidental, it can be retrieved by pressing the Undo key.
Cut and Copy
The user presses this when he wishes to delete text from one location but put it in the store to eventually place it somewhere else.
Put (and Insert Put)
This is the conventional “Paste” function, with a simpler name. When a user wishes to write over a word or block of text using text from the store, he presses Put. Or, if he wishes to insert a block of stored text in front of some highlighted text, he can press Insert Put to do this. He can double click the Insert Put to insert the text behind the highlighted text.
Show Store
When a text unit is copied, it is placed in “the front” of the store. When the user presses Put, it is placed in the text. The most-recent addition remains “in front” until the next text unit is copied into the store, and then it becomes first in line and pushes the previous unit back.
The user can press Show Store and the first line of every bit of text in the store will be shown, each one labeled with a number. The user can press Forward to move through the store, and press the Insert (Select) key to Put that unit of text in the document. Alternately, he can press the Number Row key with his thumb and then press the key which corresponds to the number of the text block in the store. When he releases the Number Row key, the text block with that number will be Put in the document.
JUMP TO Key
This key gives the user additional ways of selecting units of text.
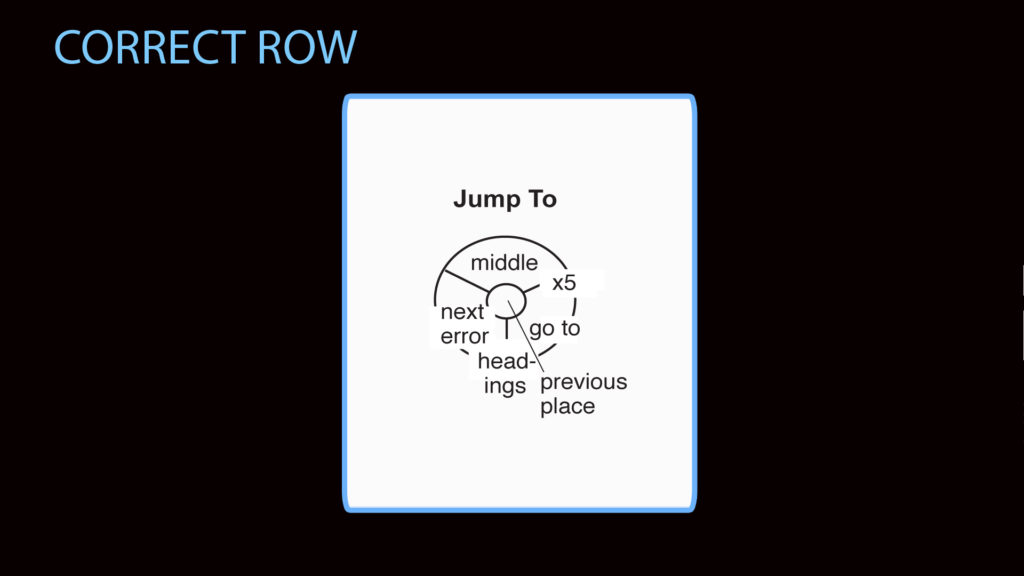
Next Error*
When the user chooses to employ Spell Check or Grammar Check, the errors are highlighted in a different color than the usual highlight. In a quick rewrite, the user may wish to move rapidly from one of these errors to the next. Pressing “next error” selects the next error to the right when the Forward key is being pressed by the thumb, and the next error to the left when the Back key is being pressed.
Headings
This is another way of moving through text quickly. Pressing this subkey moves the user to the next section heading.
Go To
By pressing this subkey and then typing a word (or phrase), the user can go to any occurrence of that word in the document quickly.
Previous Place*
When a user is copying and moving text, he often wishes to return quickly to the previous location to place that text. To return to the previous location quickly, the user can press this key.
Middle*
The Middle key selects the unit in the middle of the current selection—the middle word in a sentence, the middle sentence in a paragraph, the middle paragraph in a page, and the middle page in a document.
To give an example of its use: Suppose the user wishes to change a word in the middle of a long sentence: After pressing “sentence” to highlight the sentence, he could press “middle” and the word in the middle of the sentence will be highlighted. Then he would move Forward or Back to select the word to the right or left of it.
X5 Key*
This key, like the Middle key, saves the user the need to repeatedly press a key. Press this with any of the subkeys on the Unit key and move five of those units ahead. For example, press Back and “sentence” and “x5,” and the fifth sentence back is located and highlighted.
ARROW Keys
These keys offer an alternate way to move through text. They perform the same function as the arrow keys in conventional typing. They allow the user to move through text without highlighting text units as he goes—that is, the cursor falls between words, letters, or the selected units of text, and the user can insert text wherever the cursor lies. These keys can be used in conjunction with the Unit key to allow the user to move through text units of any size without creating highlights.
View Up and View Down
The “view up” and “view down” keys can be used to scroll up and down in chunks, just as in conventional word processing programs. Pressing “view up” brings into view the block of text immediately above the text currently in view, while “view down” does the same for text below. These keys allow the user to move through and survey text quickly, and move independently of specific text units. These keys perform some of the same functions as keys on the Move-View Row (discussed later), but they are placed here for easy access.
ALTER WORD Key
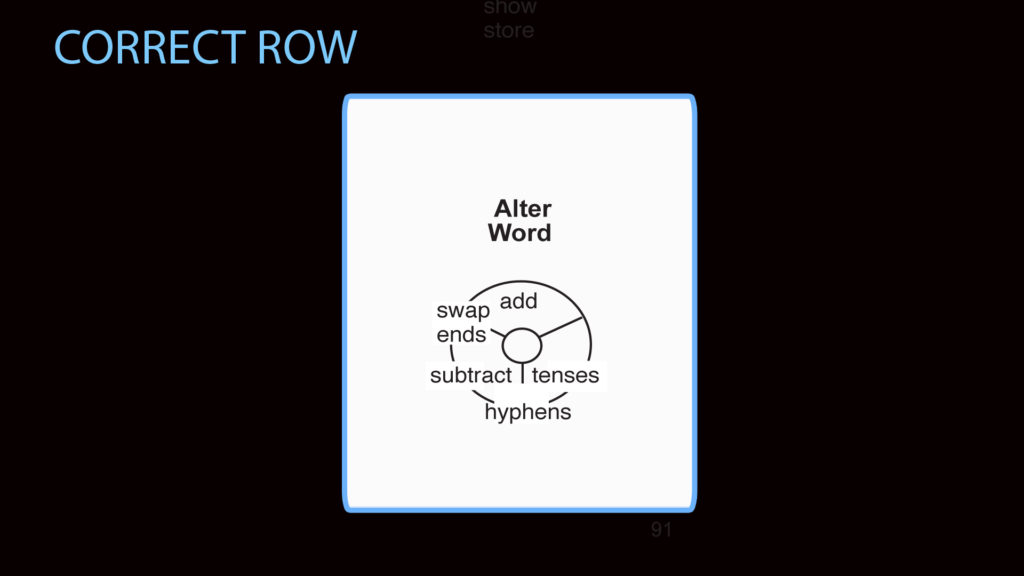
When a user makes a mistakes and doesn’t want to retype an entire word but would rather simply alter parts of it, he turns to the Alter key. The subways on this key allows the user to make quick alterations to words in ways not possible in conventional typing.
Add*
When the user has inadvertently omitted a letter from a Word, he can easily add it without having to place it in the correct place. Say, for example, he has written “exmple,” accidentally omitting the a. The user holds down the Back key to highlight the word, presses and releases “add,” then releases Back to automatically return to the Word Row. When he then types the letter a, “a” is automatically inserted between x and m to make the word “example.” In this way, the user can quickly add missing letters to words without needing to micromanage the placement of that letter.
The Add function also works with various punctuation marks. When a user wishes to enclose a word in quotation marks, for example, he highlights the text, presses “add,” then presses the quotation marks key. Quotes will be added both before and after the selected text. This same technique would work when adding apostrophes, spaces, and parentheses. All this saves the user from having to micromanage text.
Subtract*
When the user has inadvertently included an unwanted letter in a word, he can subtract it in the same manner that he added a letter: Hold down the Back key, press and release “subtract,” release the Back key, and then type the letter or letters to be subtracted—an experienced user will do this in less than a second. When done, the user presses Forward or Back to move to another Word. As with the Add function, users can subtract quotation marks, parentheses, brackets, apostrophes, and other punctuation marks. They can also subtract spaces: For example, if a user wants to change m. p. h. to m.p.h., he can highlight the letters, press “subtract,” and then press the Space key.
Hyphens
The program automatically hyphenates words at the end of a line of type, when necessary. With the “hyphen” key, the user can choose alternate ways of hyphenating a word, or manually adjust the way the word is hyphenated.
Swap Endings*
This key allows writers to swap endings of words without having to first manually delete letters and then insert other letters in their place. For example: Say a user wrote “experimental” and meant to write “experimentation.” Though the user could make the change in the typical (slow) way, he could make the change with the “swap” key more efficiently. After highlighting “experimental,” he presses “swap,” and then types “ation.” The “al” ending will be deleted and replaced with the “ation” ending. If he presses “ing,” he will get “experimenting”, while pressing”ed” will result in “experimented.”
Tenses*
This subkey is akin to the one above and can often accomplish the same ends, but it offers users more specific help with verbs. This is of particular value to those trying to master the complexities of English verb formations. When a user wants to change the tense of a verb, particularly when he is unsure of the correct one, pressing this key will list all twelve standard versions of the verb: the three tenses (present, past, and future) in each of their four forms (simple, perfect, progressive, and perfect progressive). The user can then use the Select key to choose one.
REPLACE WORD Key
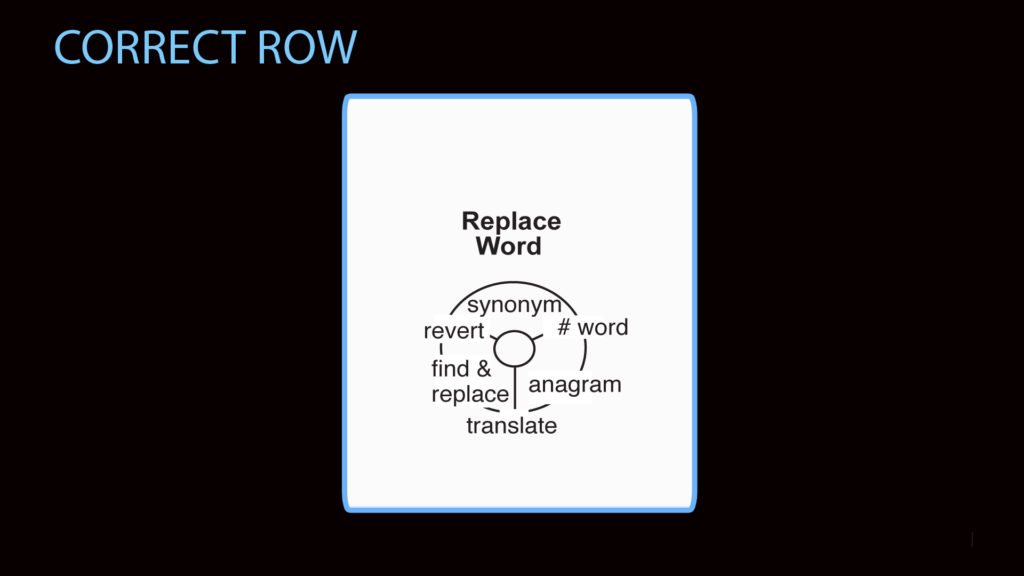
When a user wishes to replace an entire word rather than alter it or write over it, he turns to the Replace Word key. The subways offer a variety of ways to replace a word.
Synonyms (Thesaurus)
When a word is highlighted, the user can press “synonym” to see a list of synonyms for the word. The user can see definitions and common usages of these words, if he chooses. Once the list appears, the user can press Forward to move through the options, and Insert (Select) to choose one. If none are to his liking, he presses Undo to return to the Word Row.
Revert*
When a user is Speed Typing and adds an unnecessary letter to a word or omits a necessity one, the OS may recognize the resulting group of letters as a word and sequence the letters to make that word. For example, the user intends to type “holds,” but accidentally strikes the U key to get “holdsu,” which the OS makes into “should.” Before the user fixes his mistakes (perhaps by subtracting the U as described above), he may wish to see what he originally typed. In this case, he presses “revert” to revert to exactly what he typed.
Anagrams*
Some words are anagrams (“thing” and “night”), so their initial letter(s) must be sequenced correctly to distinguish them, as explained earlier. When the user neglects to do this, he can press this key to display the anagrams. In this case, the user highlights “night,” then presses the Anagram key to display “thing,” then presses Insert (Select) to select “thing” and write over “night.” This key may not save the experienced user much time, but it will help educate him about anagrams and the occasional need to sequence letters.
Translate
The user presses this when he wishes to translate the highlighted word into another language.
Find and Replace
This key has the same function as Find in conventional typing, allowing users to find all the occurrences of a word and replace them with another word, one at a time or simultaneously.
Number Words*
When the user wishes to change a number (“13”) to its English language equivalent (“thirteen”), he can do this quickly by simply highlighting the number and pressing this key. It works in reverse, too—a number can be converted into a word.
SPELLING AND GRAMMAR Key
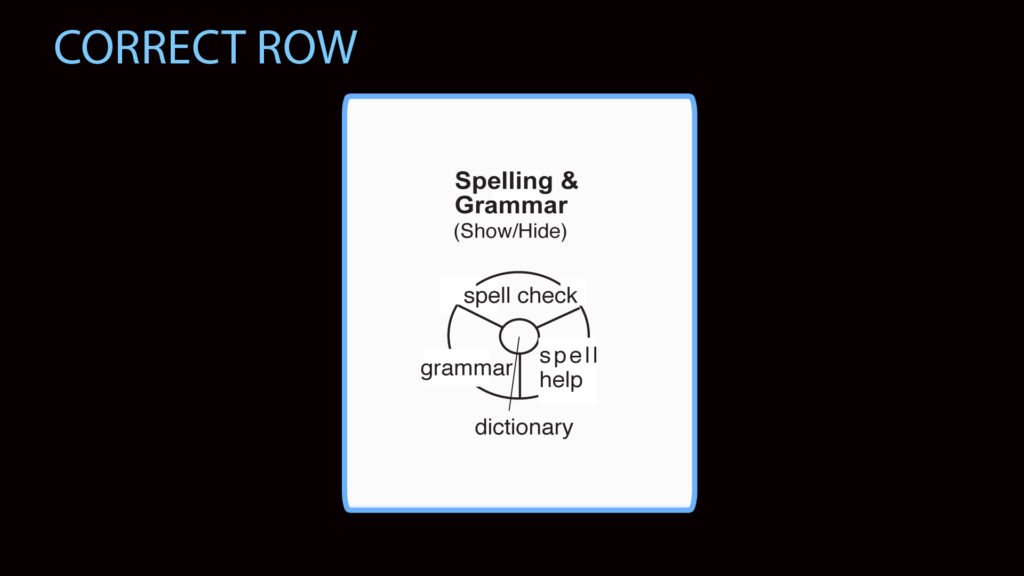
The subways of this key all have to do with operations pertaining to spelling and grammar.
Spelling Help*
If the user is wondering how to spell a word such as “bureau,” he can search for the correct spelling using a variety of search options: He can select any or all of the following parameters: “rhymes with” (furrow), “starts with” (b), “synonym with” (office, department), or “spelled like” (buraeu).
Spell Check
When the user presses this key, hall highlighted words are checked against the dictionary, and those words that are not in the dictionary are flagged in a different color than the normal highlight.
The user can quickly check the spelling of the word just typed by pressing Back and then this key. He can check the spelling within any unit of text by pressing a subkey on the Unit key (the entire document, the last paragraph, etc.), and then this key. He can also choose to have the Spell Check active as he is typing the document.
When a flagged word is highlighted, optional ways of spelling the word are listed. The user can move through these options by pressing Forward, and then select one of these words by pressing the Insert (Select) key. If he doesn’t want one of the options, he presses Undo.
Grammar Check
Pressing this key results in grammatical errors being flagged. As with the Spell Check key, the flagged word is highlighted, and options are displayed for the user to either Select or ignore.
Dictionary
After highlighting a word, the user can press this key to add the word to the Speed Dictionary or the Caps Dictionary, or both. This function is also on the Manage Row. The redundancy is intentional, as many users will prefer to perform this operation without having to leave the Correct Row.