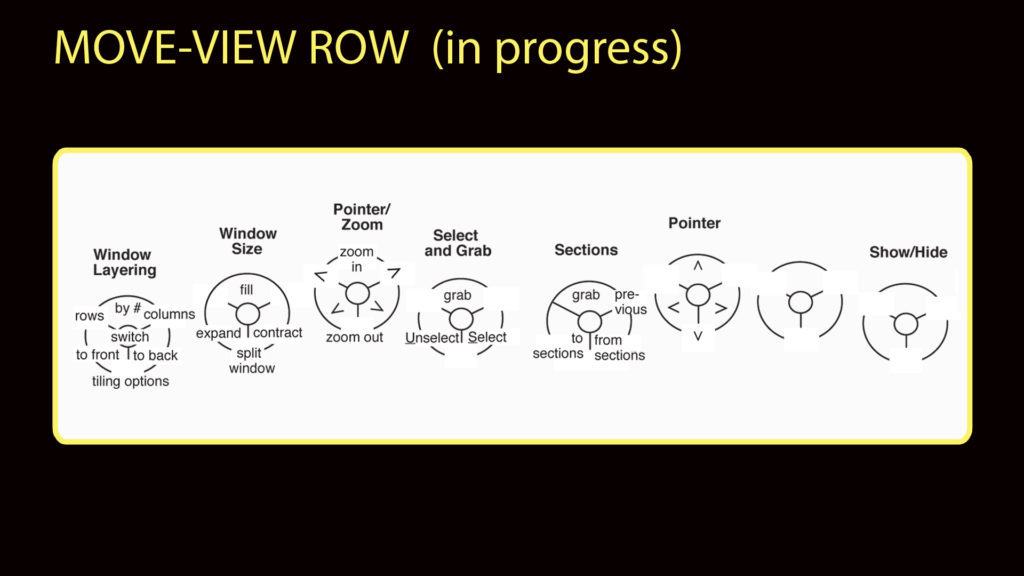
Overview of the Move-View Row
The cursor movements described so far require the presence of text. The Back and Forward keys, for example, can only perform the functions I’ve described when lines of text are present. However, users will sometimes want to move the cursor to any point on the screen instantly, and not have to rely on text blocks for the cursor to “ride” upon.
The main function of the Move-View Row is to enable the user to perform the tasks that are now accomplished with a mouse. That is, the user is able to freely move the cursor around the screen and select objects. In the Express Keys system, most editing and styling tasks can be completed in less time than it takes to reach for a mouse. This makes the use of a mouse inefficient when typing and editing. Also, a mouse is not a practical appendage when it comes to pocket-sized computers. Therefore, there must be a way to perform all the functions of a mouse using just the Finger Keys. The Move-View Row exists primarily for this purpose. The Express Keys do not exclude the use of a mouse (it is a fine tool when doing certain kinds of work), but they can perform all of its functions.
The Move-View Row also allows the user to change the characteristics of an open document—its size, magnification, etc. The user is also given various ways to change the way objects are viewed. The Move-view Row also allows the user to change the view of open documents. The user can change magnification by zooming in and out, move between different open documents quickly, and change the way the various open documents are arranged and viewed.
Move/View Row (in progress) — Left-Handed Version
I am still designing the Move Row. In future versions of this description, I will be able to describe the functions of the keys that are now blank.
Two Systems for Moving the Cursor
Currently, the Move-View Row offers two different systems for moving the cursor around the screen independently of text blocks. First, there is the Pointer and Zoom system. When a Pointer key is pressed, the Pointer is moved across the screen in straight or diagonal lines toward the desired point. The second system, accessed by using the Section key, is used when a person wants an extremely precise means of getting to any point on the screen. This section explains these two systems in more detail, particularly since the Section key idea is a new concept.
The Pointer and Zoom Keys
The middle fingers are the strongest and have the widest range of movement. Therefore, the middle finger of the dominant hand operates the Pointer key while the middle finger of the weaker hand operates the Zoom key and a few secondary Pointer keys (the diagonals). Pressing the subkeys on the Pointer key moves the Pointer in the direction shown on the key. The user can move incrementally by repeatedly pressing this key quickly or, if the key is held down, the Pointer “glides” in the desired direction until the key is released.
Though there are many other ways to arrange Pointers on the Finger Keys, I have chosen the way shown above because it uses a minimal amount of arrow keys. Actually, the minimal amount of arrows necessary to be able to arrive at any point on the screen is just four (left, right, up, down) so some people may prefer to ignore the diagonal arrow keys.
The weaker hand’s middle finger has the job of controlling the Zoom key. Press the Zoom In subkey and the rectangular area around the Pointer is magnified to fill the screen. Zoom Out, as expected, reverses this function. When used in conjunction with the Pointer keys, the Zoom keys allow the user to arrive at any location on the screen quickly. The user can arrive at a general location using a wider Zoom and then “fine tune” the positioning of the Pointer by using the Zoom In subkey.
The Select and Grab Key
The Select subkey has the same function as the click of the mouse. When pressed, it selects the object that is directly under the Pointer.
The Grab subkey is for moving objects around the screen. When pressed, the Pointer “grabs” an item on the screen so it can be moved using the Pointer keys. The Pointer will “hold onto” the object for as long as the Grab key is held down. In the event it is more convenient or comfortable, there is another Grab key that can be pressed by the other index finger.
Sections Key
The Section key offers a way to pinpoint a precise spot on the screen more quickly than the Pointer and Zoom keys.
Hold down the “To Sections” subkey and two things happen: One, the dominant side of the keyboard becomes a modified Number Row. The numbers 1 through 9 are in their normal places.
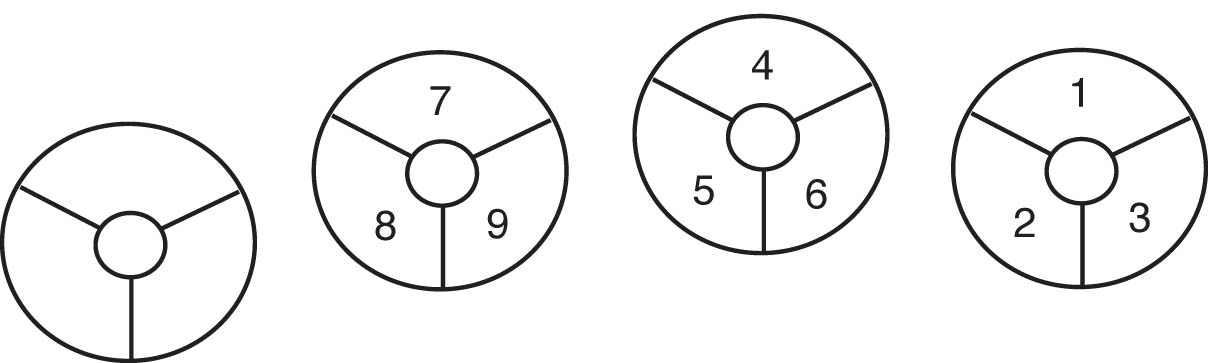
The second thing that happens is that the screen is automatically partitioned into 9 squares with the Pointer being positioned in the center of the center square (Square 5). The screen will have boxes and numbers superimposed on them that look like this:
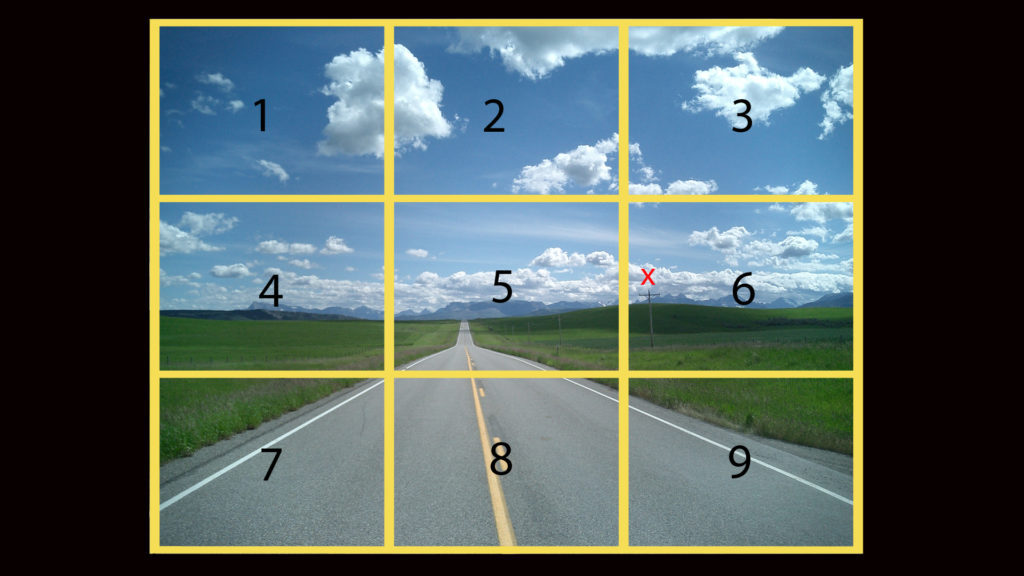
Press the number key that corresponds to the square housing the point you want to reach. That square will then expand to fill the screen and the screen will again be divided into 9 squares. Repeat this process until the desired point is reached.
Every location on the screen will have its own numerical “address” such as 55219. After using this feature for a while, the user will be able to do this quickly, sensing that the area he wishes to reach has an “address” of 542. If the point the user wishes to reach is right on the line between sections, he can push either number since the sections slightly overlap.
Pressing “previous” returns the Pointer to its previous locations. This will often allow users to move items quickly.
Window Layering and Window Size
The weaker fingers of the dominant hand operate the two Window keys. These keys change the way the open Window is viewed.
The Window Layering key offers users a number of ways to quickly rearrange open documents, switch between them, or move data between them. For example, if the user has five open documents, he can choose to have them stacked so that the right edges are layered and the document names are showing, while only the first document is fully in view. When he selects a document in the stack (such as document 4), this document then “moves” into the first position in the queue where it can be fully seen, and the sequence of document is automatically adjusted—that is, the queue is automatically reorganized. The user can also choose to arrange documents like Venetian blinds or columns, or he can have four documents in each of the four corners, and when he selects one, it expands to fill most of the screen while allowing the edges of the others to be seen.
The Show-Hide Key
This key has to do with showing and hiding such things as key functions and objects on the screen. This key is a work in progress.
Thumb Keys in the Move-View Row
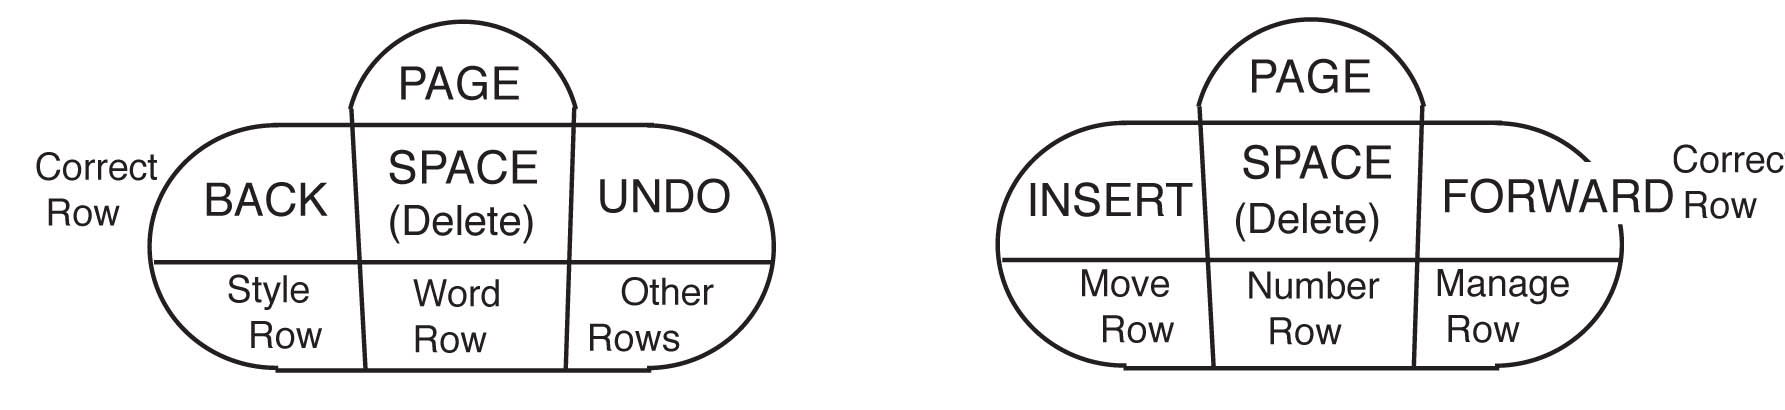
When the user is in the Move-View Row, the Cap and Opt keys will be changed to Page keys to allow the user to navigate and view multiple Windows and web pages quickly. When a user pushes Forward and Page, the screen will change to the web page or window that is Forward in the series. Likewise with Back and Page.
The Forward and Back keys will advance the cursor through the text, boxes, or columns on Web Pages. For the Forward and Back keys to have their normal Editing functions, the user must hold them down while pressing the Finger Keys, and then the Finger Keys will perform the editing functions of the Correct Row.