The Correct Row (discussed in the previous chapter) provides users with the first level of word processing. That is the only level of word processing needed for writing e-mails, personal notes, informal letters, and other uses.
Once the text is in place, users may want to alter the appearance of it. The Style Row offers a second level of word processing by making it possible to change fonts and their characteristics. Users can also change the margins, headers, columns, and so on. Any time users want to change the look of text, they turn to the Style Row.
Some users may also wish to do more advanced layout work. They may want to move text blocks anywhere on the page and integrate them with graphic elements. For that, there will be a Layout Row. This is not discussed in this document because it is not one of the basic six Rows.
An Overview of the Style Row
When a user wishes to change the appearance of text, he enters the Style Row by pressing the Style Row key with his left thumb. He then presses the Finger Key(s) associated with the desired formatting operation. In this way, the user can style text quickly, without having to reach for a mouse or move his fingers out of position. Users can style highlighted blocks of text in about the same amount of time it takes to type a capital letter on QWERTY keys.
For as long as the Style Row key is held down, the user remains in the Style Row. As with the other Row Keys, the user has the option of pressing and releasing the Style Row key (without typing any Fingers Keys in the interim) to remain in the Style Row until a different Row Key is pressed.
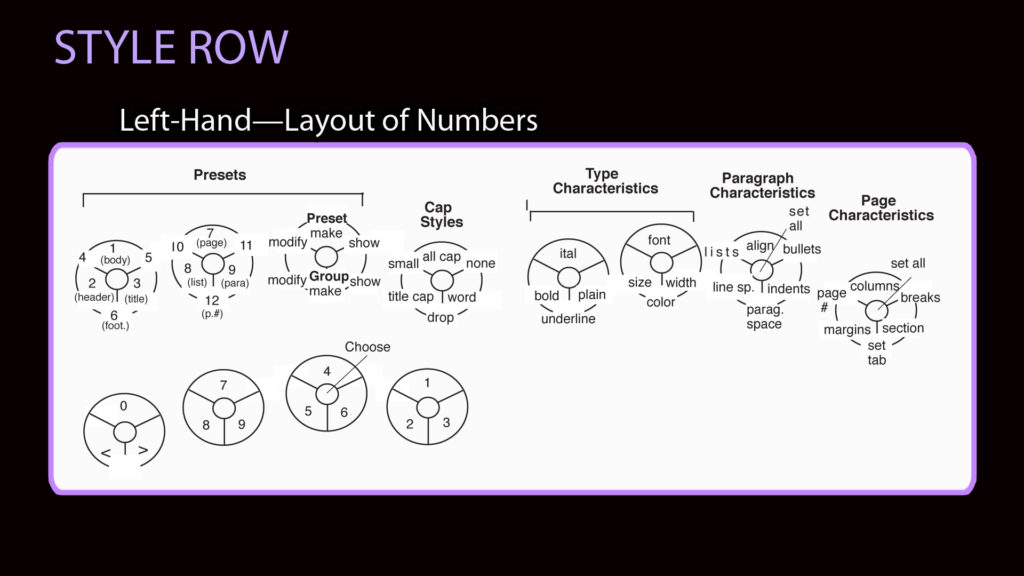
One side of the Style Row (the side operated by the weaker hand) enables the user to change the appearance of text by changing the characteristics of the type (size, font, capitalization, etc.), the paragraph (spacing, indents, etc.), and the page (columns, margins, etc.).
The reason the non-dominant hand does this work is that the other side of the keyboard automatically converts to a modified Number Row when the user wishes to change the font size, columns, or margins. Since the dominant hand is accustomed to operating the number keys, it performs this role.
To illustrate how this works: The user can press the Size key, and the other side of the keyboard becomes the Number Row so that the user can then type the number that corresponds to the font size he wants. Alternately, he can use the two arrow subkeys (< and >) on the Zero key to scroll through the options, and then press the Choose subway (with his middle finger) when he is ready to select the option he wants. The various fonts are numbered, sowhen the user wishes to change the font, he can either press the two arrow subkeys to scroll through the font options, or press the number associated with each font.
On the dominant hand’s side of the Style Row is a key featuring the various Cap Styles, and the remaining keys are for creating and activating Presets. While one aspect of text—size, font, style, etc.—is considered a characteristic, a Preset is a constellation of characteristics. The Preset keys function like the Style keys in modern layout programs, enabling the user to format many characteristics of text simultaneously.
To illustrate how the Preset keys work: Once the user has determined he wants a block of text to have the same group of characteristics as another block, he highlights the block of text that already has those characteristics, presses “make Preset,” and then presses the key he wants to be the Preset key. Then, whenever the user presses that Preset key in the Style Row, any highlighted text (or text about to be entered) will automatically be styled with the characteristics of that Preset. The Preset keys enable the user to make and access presets made of any combination of characteristics, whether these be Type, Paragraph, or Page.
So that the user can more easily remember where particular Presets are located, he is encouraged to have the Preset pertaining to the title of the document be preset 3, the Preset pertaining to lists be preset 8, and so on, though this is only a suggestion.
As in conventional word processing, each of the formatting operations on the Style Row can be performed either before or after the text is typed. To illustrate how this is done with Express Keys: If the user wants to make a word bold, he can type the word first, then press Back to highlight the word, then press the Style Row Key with his thumb and the Bold key with his finger. Alternately, he can press and release the Style Row Key and Bold key before he types the word, then type the word, and then press Style Row Key and Bold again to undo the formatting before he types the next word.
The user has another option when it comes to undoing a format: He can press the Undo Key with his thumb if the command he wishes to undo was the most recent operation performed. If the user has made a number of editing changes at once (the font, the boldness, the size) and he only wants to Undo one of these features, he can use the Undo Key selectively. While in the Style Row, the user can hold down the Undo Key and then press the subkey pertaining to the command he wishes to Undo.
STYLE ROW (Left-Handed Version)
When keys on the right side such as Size, Margins, and Columns are pressed and held, the left side becomes a modified Number Row to enable the user to quickly set numerical values.
Options Keys (In Progress)
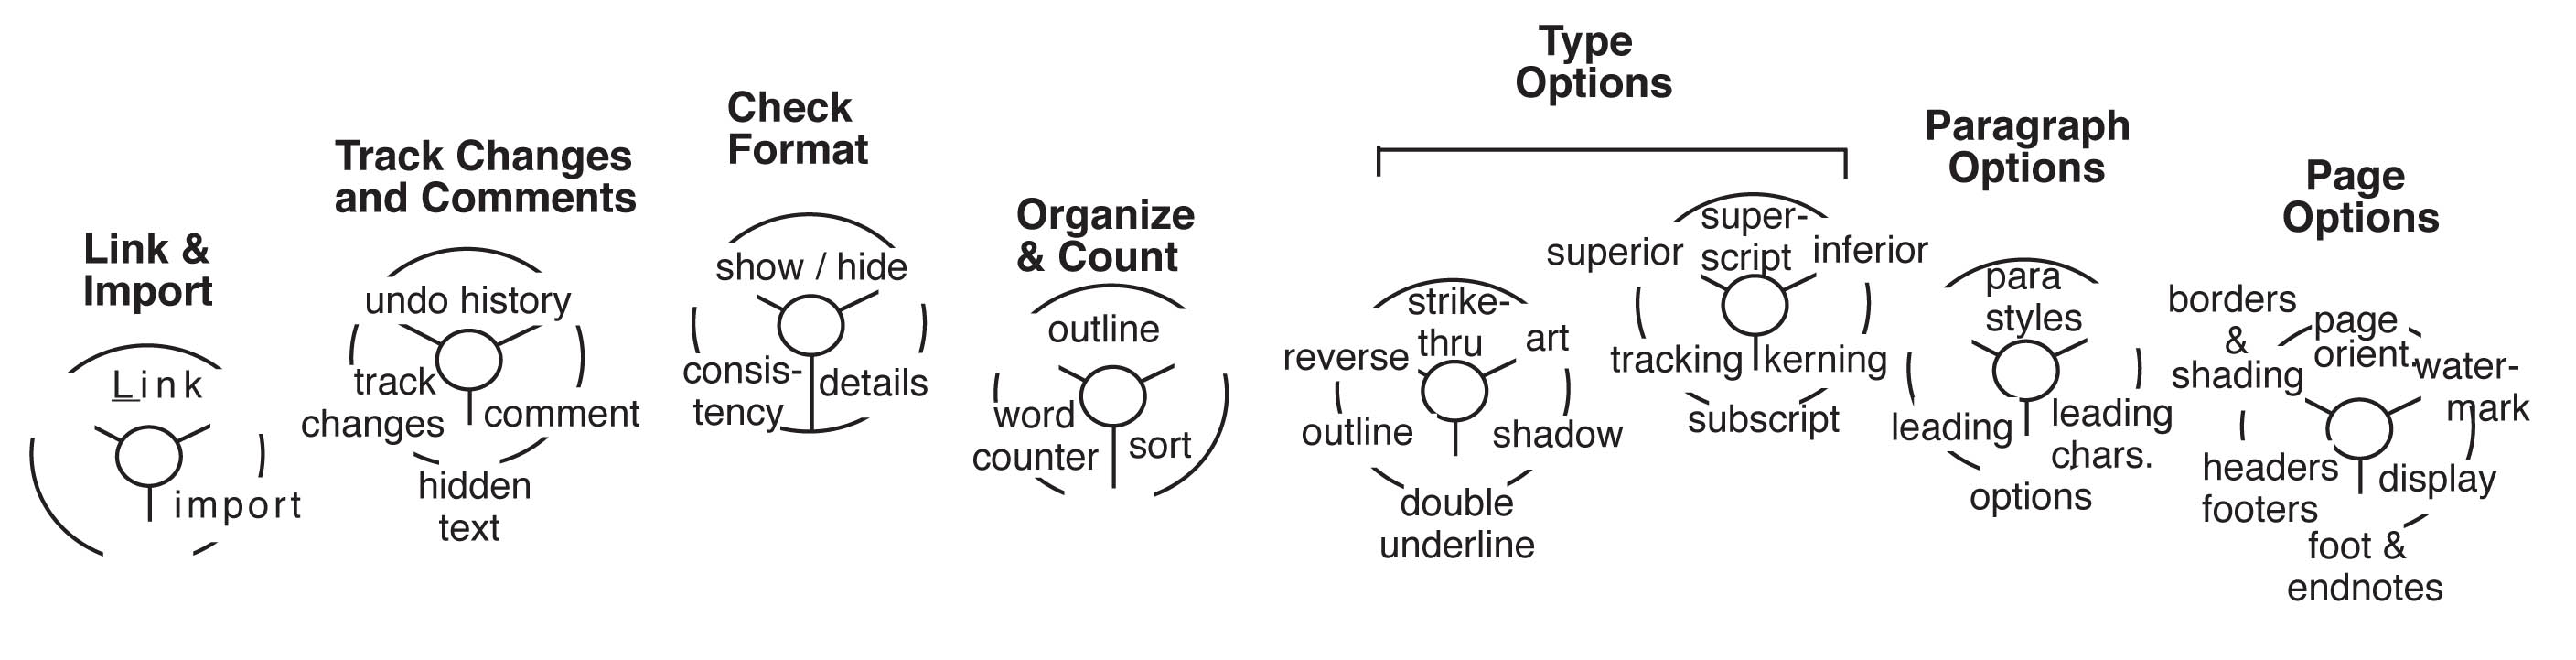
Option Keys
When the user presses the Opt key with his thumb while in the Style Row, he has further options with regard to characteristics of type, paragraph, and page. The Options keys for the Style Row (the design of which is still in progress) will offer editing functions that are used by serious writers. These will allow writers to check the consistency of formatting, count the words or characters, and so on.
More Details To Come
Since the functions of the keys in the Style Row are intentionally familiar to anyone who has used word processing functions, I will not describe them further here.